Kitchen Sink Plumbing: A Comprehensive Guide to Installation and Maintenance
Master the Essentials of Kitchen Sink Plumbing for a Smooth and Functional Kitchen Experience

Introduction
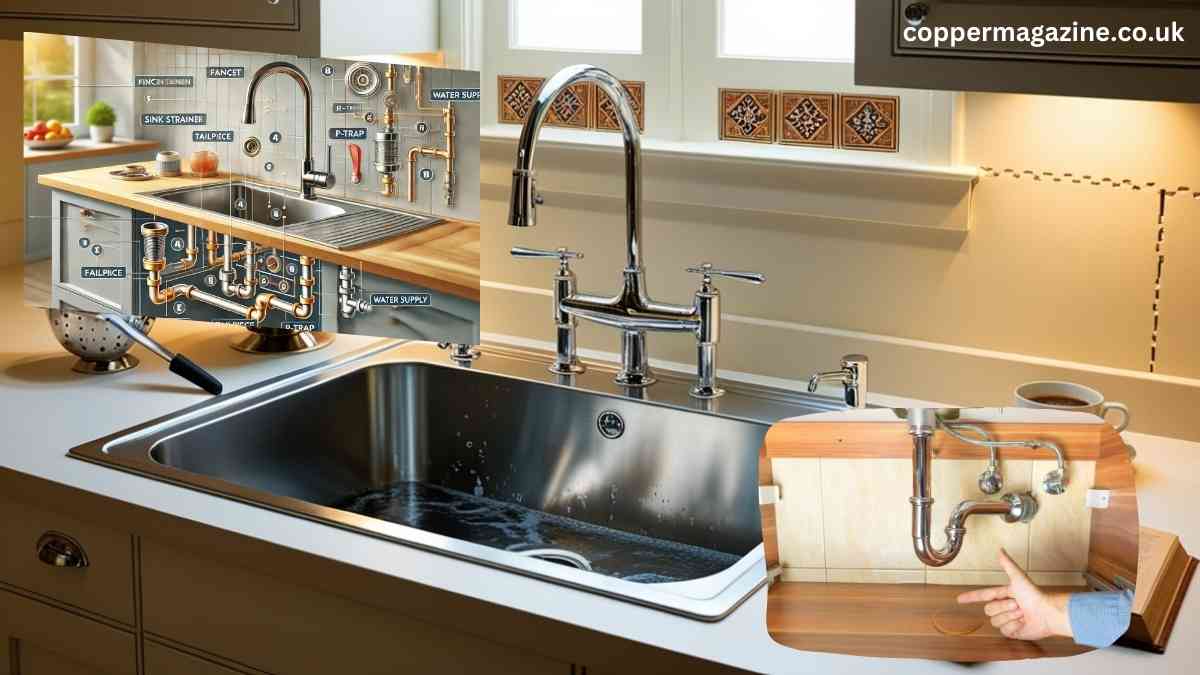
When it comes to maintaining a functional and efficient kitchen, kitchen sink plumbing plays a crucial role. From ensuring smooth drainage to delivering a steady water supply, understanding the basics of plumbing can save you time, money, and the headache of unexpected repairs. This guide will equip you with all the knowledge needed, including insights into installation, maintenance, and understanding a kitchen sink plumbing diagram for effective troubleshooting.
The Key Components of Kitchen Sink Plumbing
1. The Faucet
The faucet is the centerpiece of your sink, delivering hot and cold water for daily kitchen tasks. Modern faucets come in various styles, such as pull-out sprayers and touchless designs, combining functionality with aesthetics.
2. Sink Strainer
A sink strainer prevents large debris from entering the drain and causing clogs. Proper cleaning of the strainer is essential to maintain smooth drainage.
3. Tailpiece
The tailpiece is a straight pipe connecting the sink strainer to the plumbing system, guiding water into the P-trap.
4. P-Trap
The P-trap is a U-shaped pipe that retains water to block sewer gases from entering your kitchen. It’s a vital component in any sink plumbing system.
5. Shut-Off Valves
Shut-off valves, located beneath the sink, allow you to control the water supply to the faucet. These are especially handy during maintenance or emergencies.
Understanding a Kitchen Sink Plumbing Diagram
A kitchen sink plumbing diagram visually represents the arrangement of components, from the faucet to the drainage system. It highlights the connections between the sink strainer, P-trap, tailpiece, and the main drain line. Reviewing such a diagram can help homeowners better understand their plumbing system and troubleshoot common issues effectively.
Installing Kitchen Sink Plumbing
Step 1: Prepare Your Workspace
Clear the area under the sink and gather tools like a wrench, plumber’s tape, and pipe fittings.
Step 2: Mount the Faucet
Install the faucet according to the manufacturer’s instructions, ensuring all connections are securely tightened to prevent leaks.
Step 3: Set Up the Sink Strainer
Place the sink strainer in the drain opening and secure it with plumber’s putty, a gasket, and a locknut for a watertight seal.
Step 4: Attach the Tailpiece and P-Trap
Connect the tailpiece to the sink strainer, followed by the P-trap. Align and tighten all fittings to ensure a secure connection.
Step 5: Connect Water Supply Lines
Attach the hot and cold water supply lines to the shut-off valves and the faucet. Turn on the water to check for leaks and proper flow.
See also read: PEX Plumbing: The Ultimate Guide to Modern Plumbing Solutions
Common Problems and Their Solutions
1. Clogged Drains
Clogs often occur due to grease, food particles, or soap scum. Avoid these by using a drain strainer and regularly cleaning the drain. A plunger or a plumbing snake can help clear stubborn clogs.
2. Leaking Pipes
Leaks can arise from worn-out gaskets or loose fittings. Regularly inspect all components for signs of moisture and repair or replace faulty parts promptly.
3. Low Water Pressure
Low water pressure may result from clogged aerators or kinks in the supply lines. Cleaning the aerators and ensuring straight, unobstructed supply lines can resolve this issue.
4. Backflow Issues
Backflow happens when wastewater flows back into the sink due to improper drainage. Installing a proper P-trap and maintaining the drainage system can prevent backflow.
Maintenance Tips for Long-Lasting Plumbing
Regular Cleaning
Clean your sink, faucet, and drain daily to prevent buildup of grime, bacteria, or food particles.
Inspect for Leaks
Periodically check all components under the sink for leaks or wear and tear. Fixing minor issues early prevents costly repairs later.
Avoid Harsh Chemicals
Use enzyme-based cleaners instead of harsh chemical drain cleaners to protect your plumbing and the environment.
Seasonal Check-Ups
Inspect pipes for cracks and leaks, especially before winter. Insulate exposed pipes to prevent freezing and bursting during colder months.
Upgrading Your Kitchen Sink Plumbing
Consider upgrading your sink plumbing to enhance both functionality and aesthetics. Options include installing a modern faucet, adding a garbage disposal unit, or using stainless steel pipes for better durability. Consulting a professional plumber can ensure a seamless upgrade that complies with local plumbing codes.
Conclusion
Understanding kitchen sink plumbing and its components, combined with regular maintenance and the ability to read a kitchen sink plumbing diagram, can help you maintain an efficient and problem-free kitchen. By mastering the basics outlined in this guide, you can handle minor plumbing tasks yourself, saving money and avoiding inconvenient repairs. With a little effort and knowledge, you can ensure your kitchen sink remains in excellent condition for years to come.


One Comment